


Volume Profile Trading: Trend Profiles, Single Prints, and Composites.
Following the trend and profiting from unusual profile types.

Welcome everyone to another lesson on Volume Profile trading. If you haven’t already be sure to check out our first Volume Profile lesson to brush up on the basics.

In this lesson I will be discussing trend (thin) profiles and some not so typical profile shapes and patterns. These concepts will include single print profiles, value retraces (80% rule) and composite profiles (combining multiple profiles together).
Lets get started.
To begin I need to first discuss a key concept of value generation. In order for a trend profile to develop there needs to be two key factors being achieved. The first factor is there needs to be clear value being generated. The second factor is that value needs to be protected. What do I mean by this?
To generate value we need to see a strong HVN (High Volume Node) building up on the profile. For a trend profile aka a thin profile to develop we need to see this HVN node build outside of the current value area. Once the volume begins to flood in above the VAH or below the VAL (this indicates outside of value) we want to see the node build up to be greater than the value around the VAH/VAL. For example if the peak of the node at the VAH is 10,000 contracts traded we want to see the peak of the node above the VAH trading greater than 10,000 contracts.
Now for the second factor to play it’s part. What does it mean to protect value? Protecting value can be seen as a few different patterns in technical analysis. The pattern I like to watch is the DOM (depth of market) and Tape showing buy pressure as price pulls back into the HVN node (this is the node above the VAH). For this node to be protected we need to see buyers buying the peak level of the node and not allowing price to consistently trade below the node. This protection can be seen as moving averages being bought, responsive delta coming in, candle lows being protected, etc… long story short you don’t want to see a lot of sell pressure as price is trading at the peak of the node or below, you want to see a lot of buy pressure as prices pulls back into it and moves higher.
Now for the next stage. Once value has been built and protected we need to see price do it all over again. As price bounces off the node it should begin to look for higher prices and establish a new node, once that node is established it needs to be protected and the cycle continues.
Let’s cover some of these trade examples;
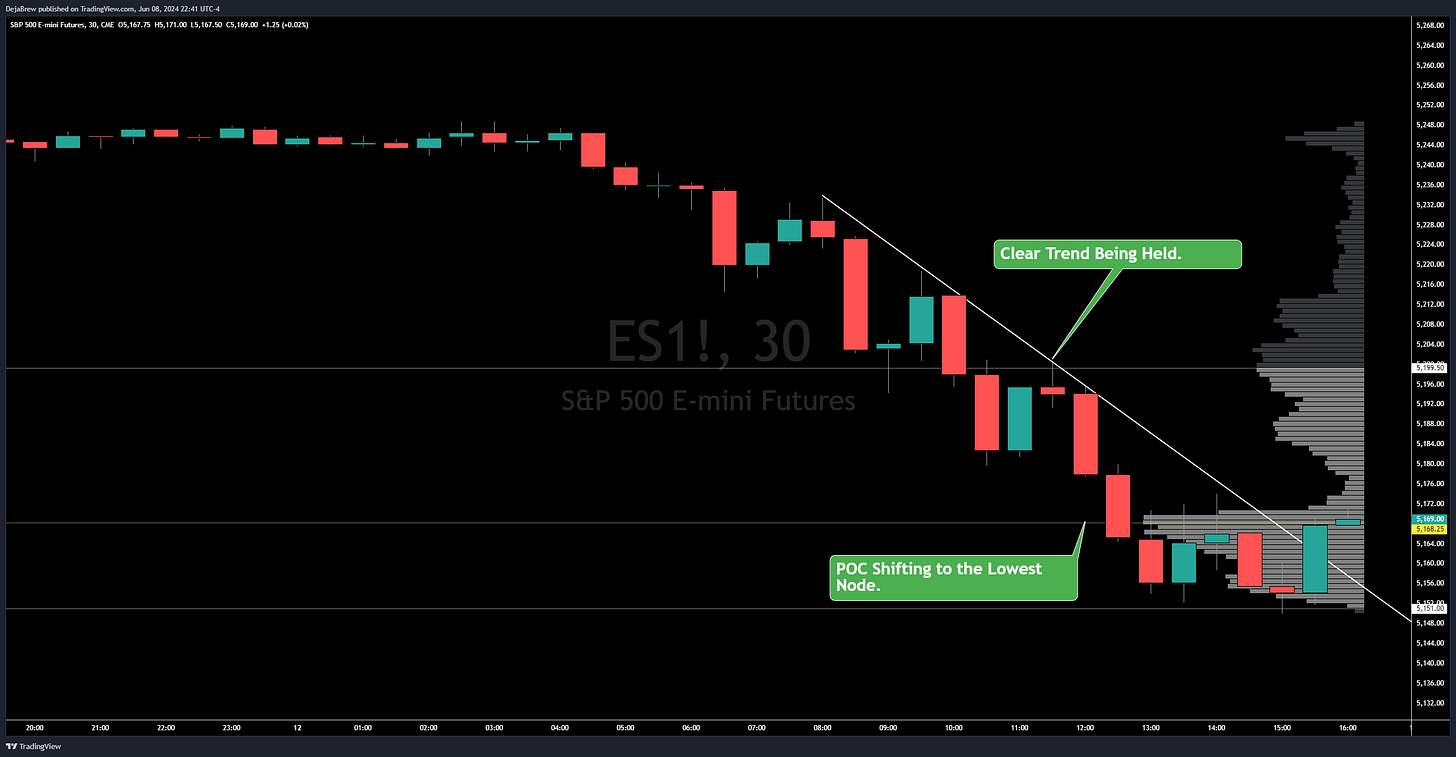
Trend Profile: A trend profile is clearly defined by not falling into any of the other shapes we have covered up to this point. It doesn’t fall into the D shape balance, it doesn’t show a clear imbalance like a P, b, or B shape profile. The trend profile has many nodes, typically more than 3-4 and these nodes are usually about the same size. A trend profile is also usually increasing or decreasing value from the prior day, it is rare to see a trend profile during an inside day (trading inside the previous day’s value).

This is what the trend profile would look like as it begins to form. The first sign is the major node building above the VAH.

A typical trade would be entering with the trend once the HVN has been established. A stop should be placed below local support from a node or the VAH. The target would be a previous value level such as a VAL, VAH or POC or the trade could be held until price fails to protect the new HVN node. A stop could also be trailed with the trend using moving averages or candle lows, I like to use the 30min lows.

Another trait to lookout for on trend profiles is the POC shift. A trend that has a lot of volume will consistently shift the POC in the direction of the trend. Sometimes this will require the trend to slow down, because normally a POC needs to be stable on a certain price for sometime before shifting, but this shift can also be very rapid thanks to large block trades or buy/sell walls.
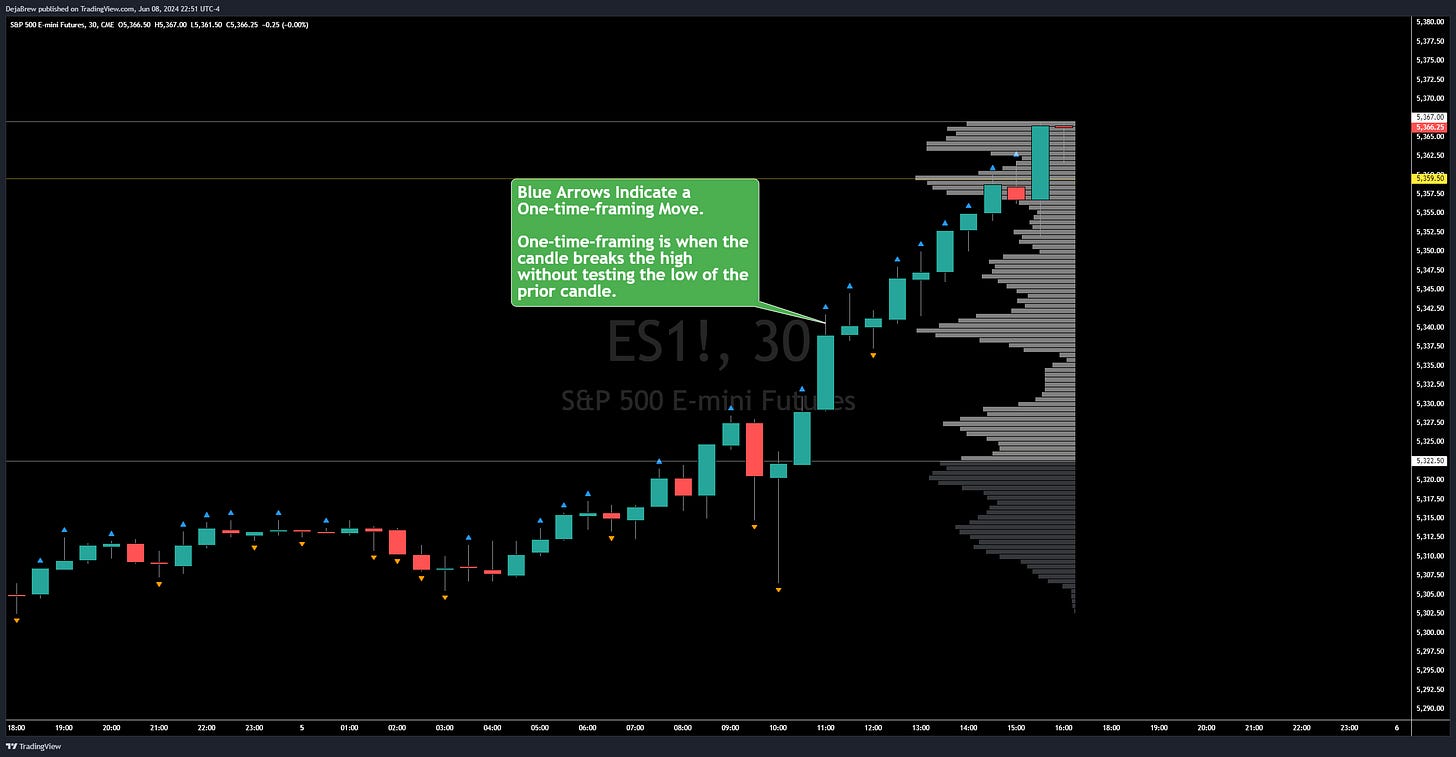
As I discussed earlier there are many ways to see a trend profile with technical analysis, but one of my favorite ways is to look for One-Time-Framing moves. I look for these types of moves starting to build on the 5min chart and expanding onto the 30min chart. One-Time-Framing is a fancy term for when something is clearly trending in one direction by consistently breaking the prior candles high without testing the lows and vice versa for shorts.
Single Print Profiles: A single print is caused by very strong momentum in one direction. This momentum creates a price inefficiency very similar to a volume gap. Just like a volume gap this zone is an area of rejection, prices are not finding value there. Areas of rejection have two main uses, they can act as a strong wick zone or they can be filled in. If its going to be a strong wick zone price should quickly bounce out of it into the direction of the trend. If its going to fill in, prices should hang out inside the zone with multiple candle closes. It is very hard to predict which of the two options it will choose and it is best to react and not predict.

A typical trade would be either using the single print zone as a pullback entry point to enter the prevailing trend or trading the rejection of this zone into the opposing trend. In this example I show how you would use it to enter the prevailing trend. Entry would be taken once a wick has tested the Single Print zone and closed bouncing away from it. Stop would be placed below the zone and targets would be previous value levels

In this example I show how you would use it to enter the opposing trend. Entry would of been taken once the Single Print zone was lost with strength. Stop can be placed above the Single Print zone or in this case above the strong POC node above. Targets would be previous value levels.

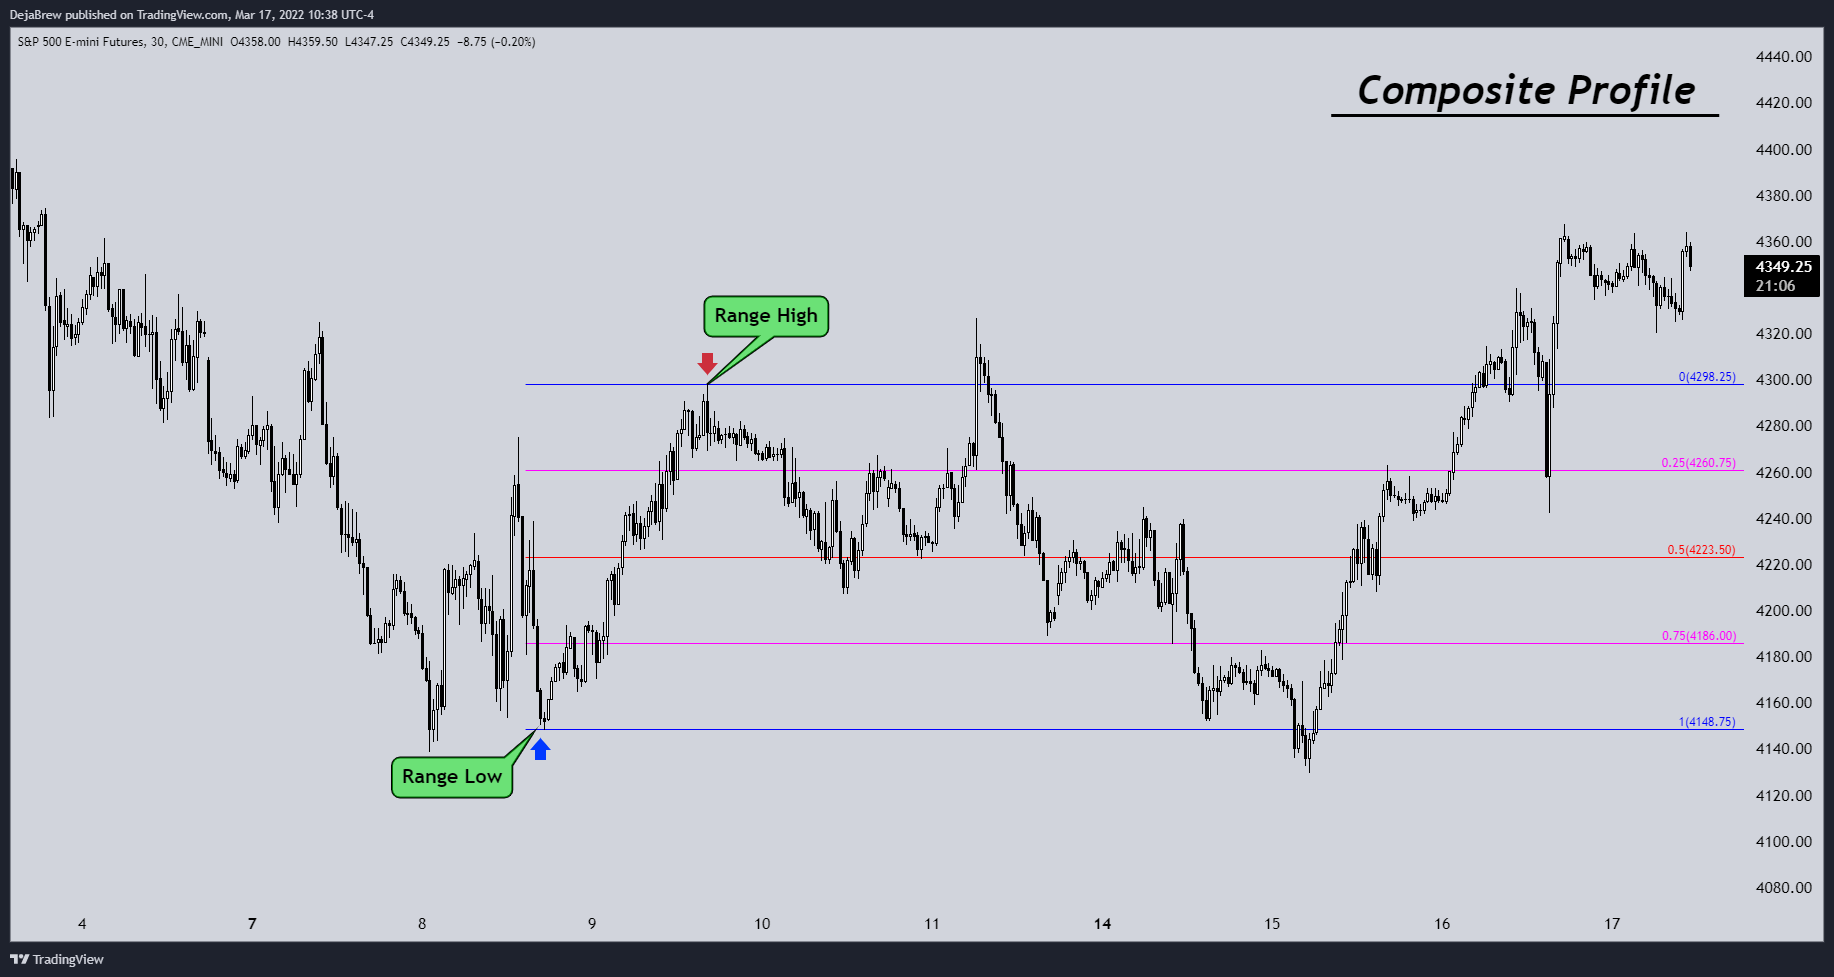
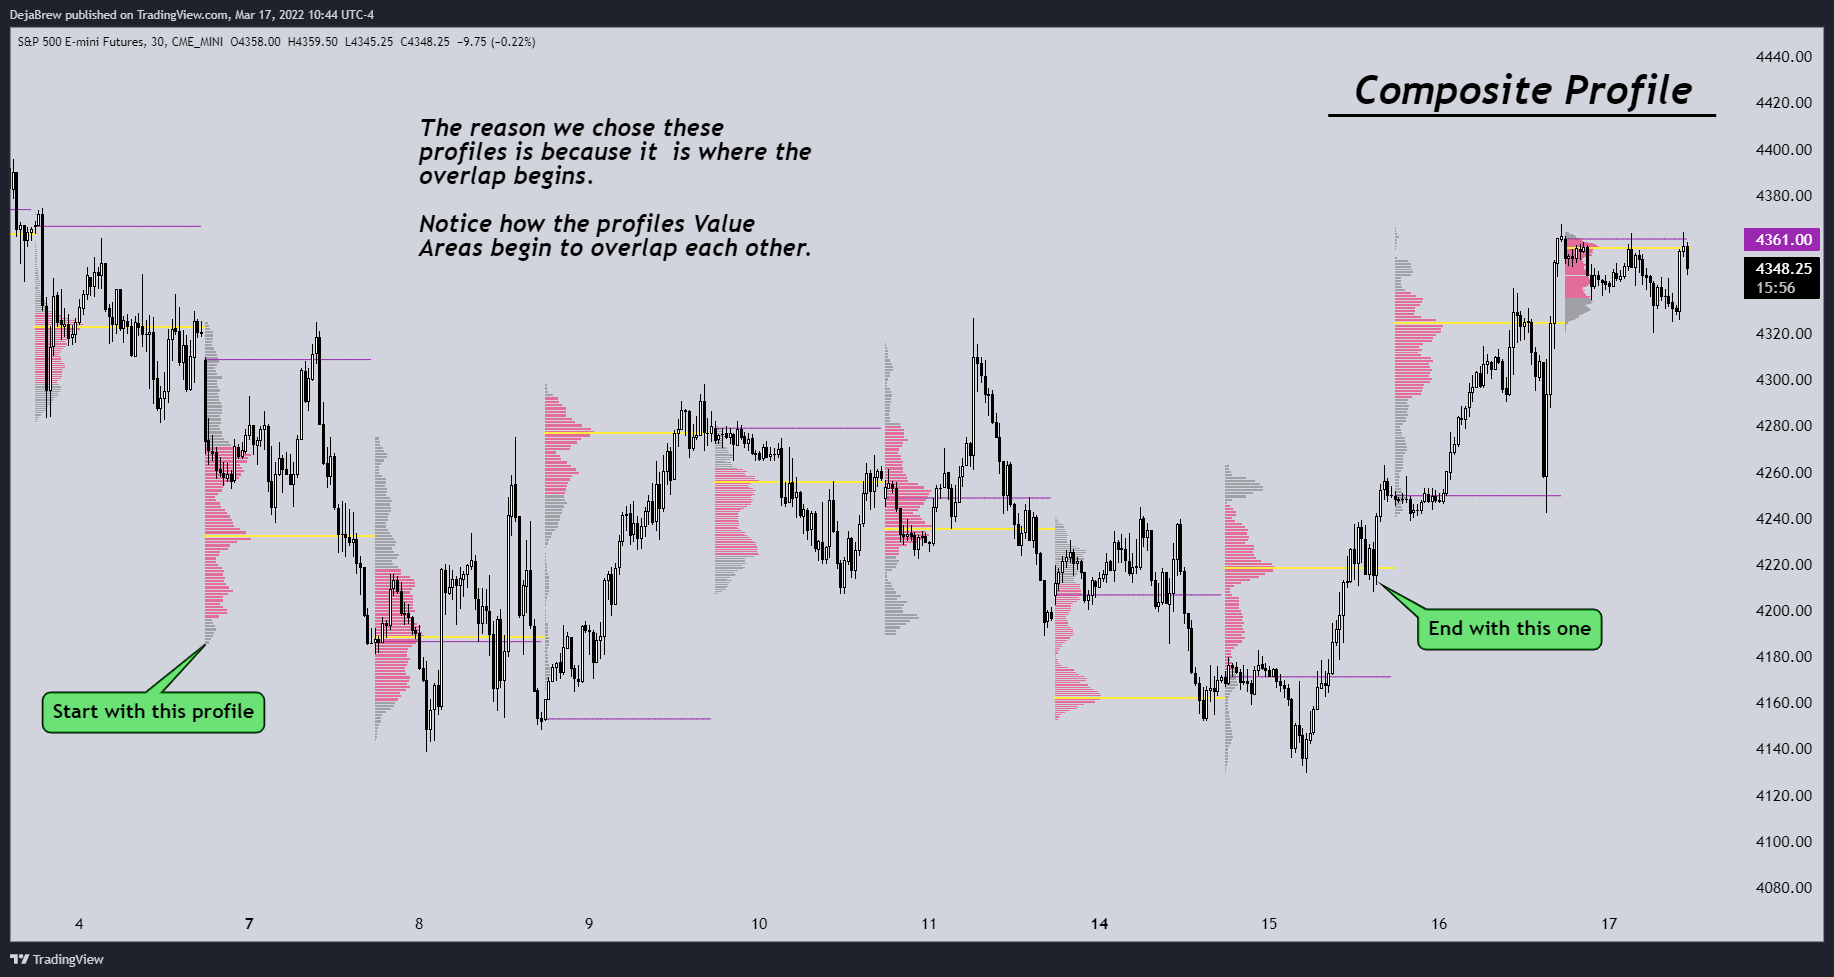
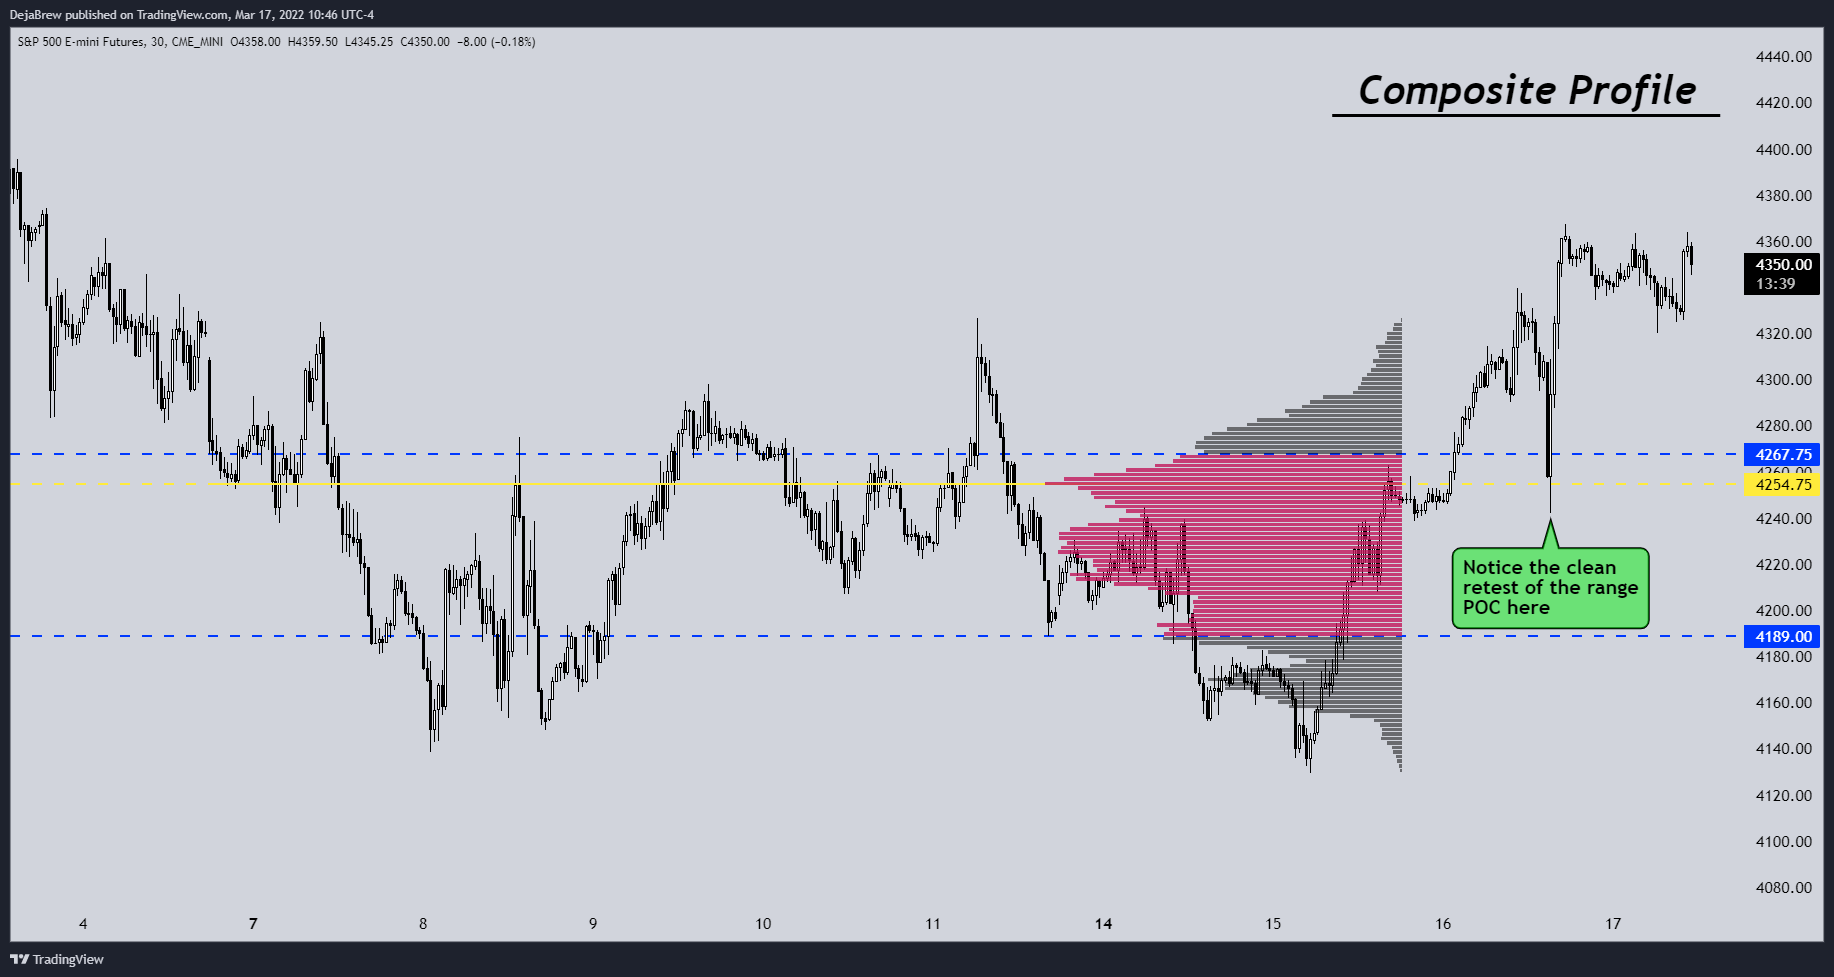
Composite Profile: A composite is when you combine more than one profile into a bigger profile. This method is helpful when trading accumulation or distribution patterns. These composites give the user a better understanding of where the true value is in the entire range. It will show the range's Value Area High, Value Area Low, and Point of Control. These three key levels can be used instead of or in tandem with the Range High, Range Low, and Mid Point. A good example of a composite is the Visible Range Volume Profile tool on Tradingview, but I prefer to draw my own profiles using the Fixed Range Tool found in the toolbar.
Here is an example of a typical Accumulation range.

This is how we would build a composite profile from that range.

Here is how you would grab levels from the composite.

You can also note any major volume gaps or volume nodes if you wish.
A typical trade would be using the profile just as you would a range. Buying breakouts which hold above the VAH or Shorting breakouts that hold below the VAL. Stops should be placed underneath major support nodes for longs and above major resistance nodes for shorts. In this example I show how a retest buy would have played out.

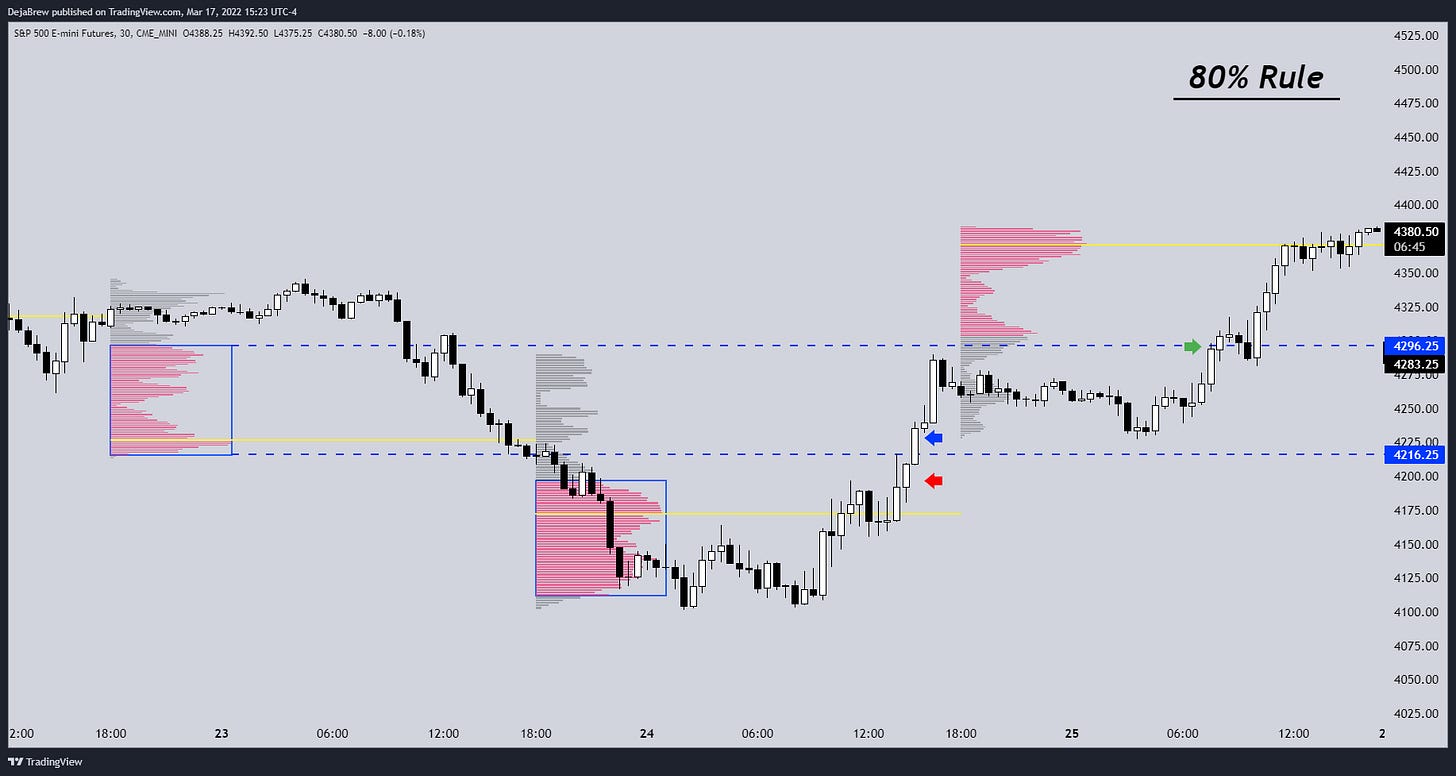
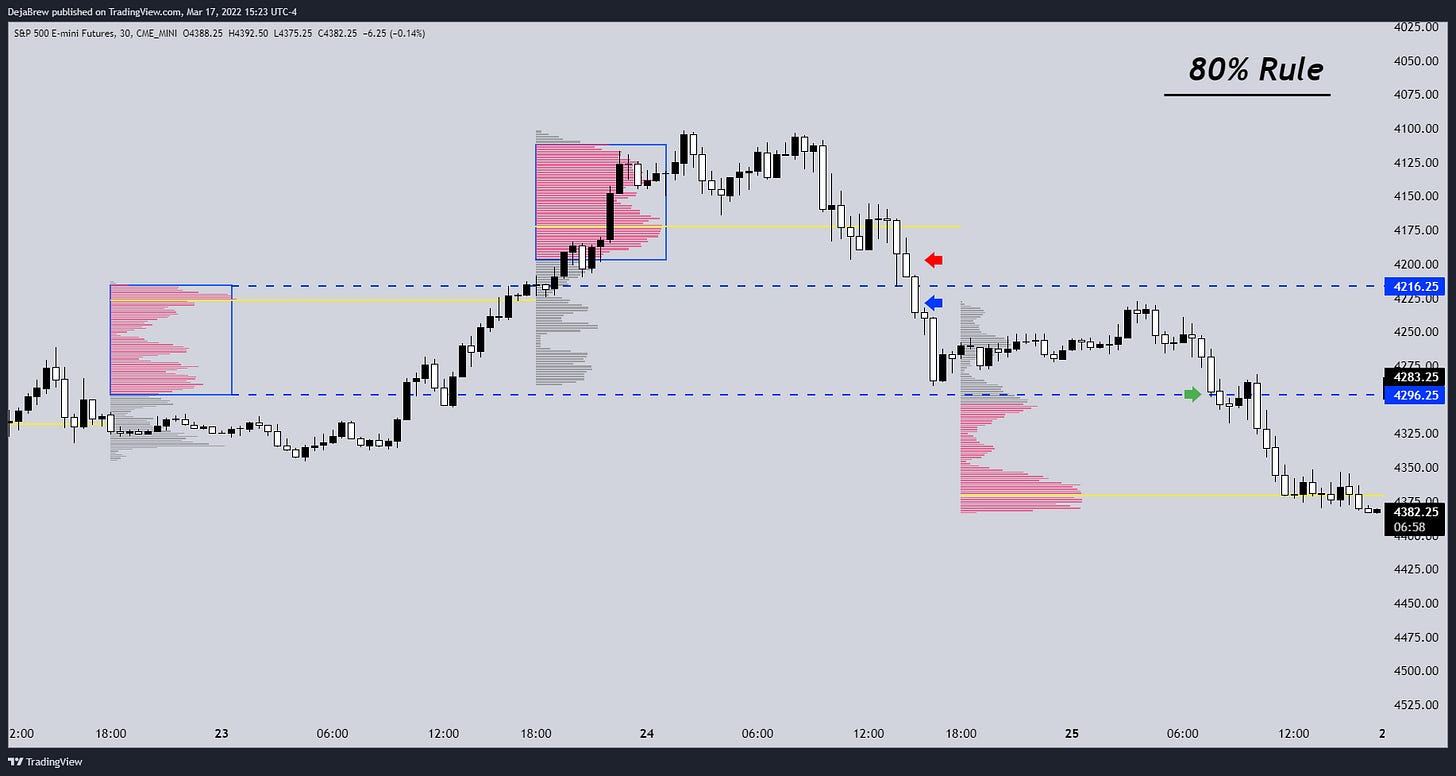
80% Rule: An 80% Rule trade can be found when price finds value above or below the previous day's value area and then begins to retrace into the previous day's value area. Once price breaks and holds inside the previous day's value area there is a very high chance it will traverse the entire value area. If it broke back into the VAH then it will likely see the VAL and vice versa.
In this example we can see a bullish 80% rule playing out.

A typical trade would be longing once price breaks and holds back above the VAL and then targeting the POC and VAH. The stop should be placed below the VAL in this case.
A typical bearish trade would be shorting once price breaks and holds below the VAH and then targeting the POC and VAL. The stop should be placed above the VAH in this case.


That is all for this lesson, thank you for reading this far and if you have any questions please feel free to leave a comment and I will get to it as soon as possible. I will have more lessons coming out soon on the other profile shapes and how to trade them.
Deja Brew - The Alchemist of Trading. Transforming market chaos into easy to understand logical order!
Deja - Thanks lot for all your time in creating such a clear step by step explanation with very nice pictures and pointers.
Question: For the 80% rule trade, when price entering below VAH and holding, on what time frame do we decide that it's really holding ? In your example, I see it's 30 min. But watching on a 30 min, wouldn't price end up closing way too low below VAH to confirm, that our stops become too wide (placing above VAH) to enter the position ?